Install and configure the first domain controller
Install a clean Windows 2008 R2 Server
The first server you install in a corporate computer network should be a domain controller. Windows Active Directory Domain Services is the heart of a Microsoft Domain. In this article we’ll use Windows Server 2008 R2 (Enterprise) full installation. The Windows 2008 Server edition used for setting up a domain controller doesn’t have to be an Enterprise edition. In contrast to Windows Server 2003, this was expecting an Enterprise edition for this server role.
First of all you need to install a Windows Server 2008 R2 Standard (or Enterprise) edition.
When the installation is complete and Windows starts for the first time, you’ll need to change/set the local Administrator password. If you do not change this later, this will be your new Enterprise Domain password.
We’re assuming you setup correct network settings, like a static IP address and static DNS addresses.
Before promoting this server to be a domain controller, make sure you give it an appropriate hostname. We’ll use DOM1-DC1. As the name states, it is the first domain controller in the first root domain. Because we don’t have a domain yet, it is part of a Windows Workgroup, named WORKGROUP.
Here are the network settings I use for this article.
IP address: 192.168.0.60
Subnet mask: 255.255.255.0
Default gateway: 192.168.0.1
Preferred DNS server: 8.8.8.8
Alternate DNS server: empty
For the primary DNS server I use Google’s public DNS server (8.8.8.8). This is an external DNS server, available everywhere on the internet. You can also use your preferred ISP’s DNS server(s).
Don’t forget to update your Windows server with the latest updates!
Promoting this server to a Domain Controller
There are different ways to install the Active Directory Domain Services server role onto a Windows server, but the preferred way is by the command line application dcpromo.exe.
You just have to open a Command Prompt window with elevated rights. In other words, open a Command Prompt window with Administrator rights. This can be accomplished by right clicking the Command Prompt icon in the Start menu and select Run as administrator. Make sure you logged in with the local Administrator user account before doing this.
On the Command Prompt type dcpromo and press ENTER.
First the Active Directory Domain Services binaries are being installed, this will take some time.
After this the Active Directory Domain Services GUI will pop up and guide you through the installation process.

Select Use advanced mode installation and click Next.
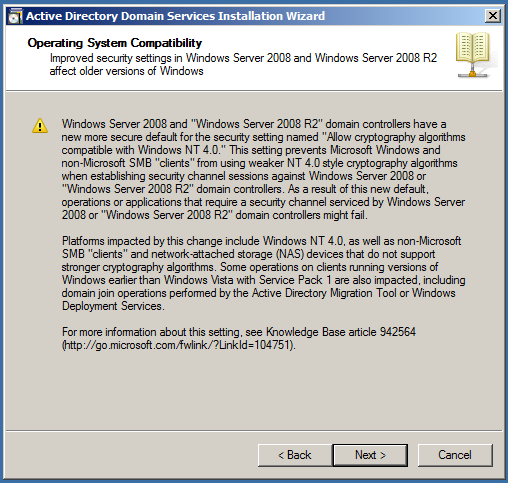
Operating System Compatibility
After this a warning message appears telling you about the security impact of the Windows 2008 domain controllers. Click Next..
Choose a Deployment Configuration
As this is the first domain controller in a new forest we want to create, we’ll have to select Create a new domain in a new forest. A forest is on top of the hiarchical structure of a corporate Windows network. It houses all the domain controllers. By doing this we create a forest root domain. Click Next.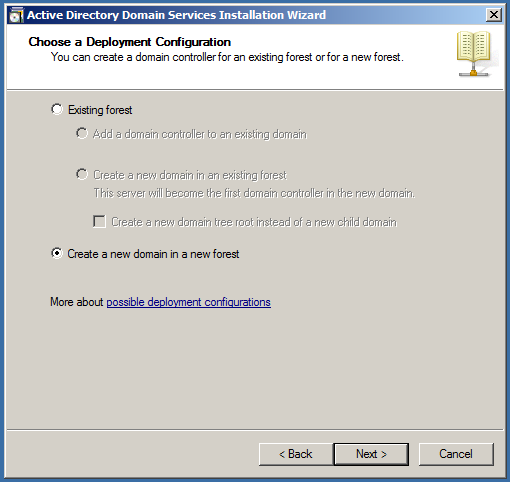
Name the Forest Root Domain
Now
we’ll have to type the FQDN (Fully Qualified Domain Name) of the forest
root domain. This is the name we’ll use for our root forest. Preferably
it has to be unique on the internet. In this example we’ll use domain1.com. Click Next.
Domain NetBIOS Name
Choose
an appropriate NetBIOS name. The wizard makes a pretty good suggestion.
I recommend you use this name not to complicate things too much, or
have a good reason not to do so. In our case we use DOMAIN1. Click Next.
Set Forest Functional Level
Here
we’ll have to choose the Forest Functional Level. As this is a complete
new forest we install, we can choose the same Forest Functional Level
as our Windows Server version. This is of course Windows Server 2008 R2.
However the latest Functional Level is Windows Server 2012, we cannot
upgrade to that level because our Windows Server version is not suited
for that Functional Level. Click Next.Note:Please do not choose this functional level if you add this domain controller to an existing forest or domain with a lower functional level! Before doing this you’ll need to upgrade the domain schema version within that forest or domain to the functional level supported by the new domain controller! Also all domain controllers within that domain or forest need to run on a Windows Server version corresponding to the same Functional Level.
However it is possible to setup a Windows Server 2008 R2 domain controller in a Windows Server 2003 domain with a Windows Server 2003 Functional Level, as long as you configure this Functional Level (2003) during the installation of the more recent domain controller. By doing this, the Windows Server 2008 R2 domain controller just isn’t using its full potential, but will be ready for a future domain/forest Functional Level upgrade.
Additional Domain Controller Options
It is recommended to install the Windows Server DNS server role on a domain controller. Therefore I suggest you select DNS server. The first domain controller is by default a Global catalog and is integrated by design. Click Next.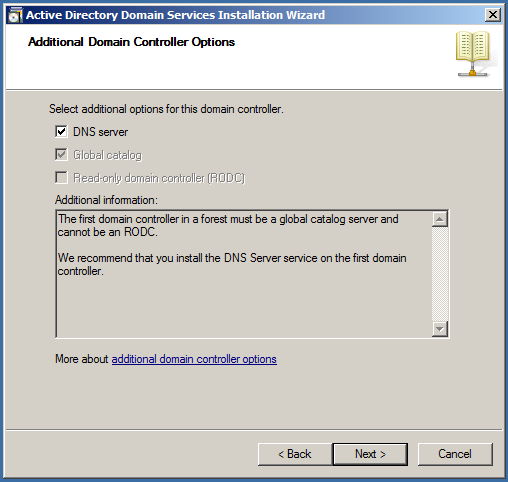
Warning MessageWhen you install your first domain controller in a new forest, you’ll get a disturbing warning message throwing at you.

A delegation for this DNS server cannot be created because the authoritative parent zone cannot be found or it does not run Windows DNS server.…
What does this mean? Well, it sounds worse than it is actually. It’s all about DNS. Remember we used an external DNS server (Google’s public DNS server) in our networking settings? Well, this installation tries to update the parents DNS server (Google’s) with a delegation for this new DNS server. And it is just not possible to change settings like that on an external DNS server like Google’s DNS server or your ISP’s DNS server(s). It’s simply not allowed and very understandable.
This warning message is also thrown if you add and additional domain controller in an existing domain (no new domain tree) and your DNS forwarder is setup to an external DNS provider.
Click Yes to continue.
Location for Databases, Log Files, and SYSVOL
Unless you want to move the data to another partition because of performance or security reasons, keep the default locations and click Next.

Directory Services Restore Mode Administrator Password
If you ever need to restore your Active Directory (I hope you don’t), you’ll need this password.
Choose a strong password and make sure to document this! It’s not the same as your Domain’s or Forest’s Administrator password. Click Next.
Summary
Finally
you’ll get one last overview of all the settings and are ready to
promote your server to a domain controller. If you need to change any
setting at all, do it here. It’s your last chance. Click Next.Wait for the installation to finish…
When dcpromo succeeds, you see this final window. Click Finish.
After this you’ll be asked to restart the computer. Click Restart Now.
Configure the DNS server
In the Windows network settings, the preferred DNS server is changed from 8.8.8.8 to 127.0.0.1. This is caused by the DNS server installation. All DNS requests in this domain will be handled by the DNS server role which is installed onto this domain controller. If you need to look up an external domain, the DNS server will forward these requests to our previous configured DNS server (8.8.8.8). You can find these settings by opening the DNS Server console window. Expand the DNS tree and right click on the hostname (DOM1-DC1). Select Properties and go to the Forwarders tab. Here you can change, add or remove DNS forwarders from this list by clicking the Edit… button.

Prepare the DNS Server for the child domain
Open the DNS Manager console and expand your DNS domain tree. Right click on Forward Lookup Zones and select New Zone… In the welcome screen of the New Zone Wizard, click Next.
Zone Type
Select Primary zone and enable Store the zone in Active Directory. Click Next.
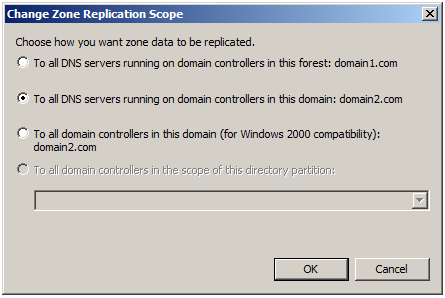
Active Directory Zone Replication Scope
Select To all DNS servers running on domain controllers in this forest: domain1.com. Click Next.
Zone Name
Type
an appropriate zone name. The zone name is actually the name of the
second child domain we want to add (domain2.com). Click Next.
Dynamic Update
Select Allow both nonsecure and secure dynamic updates. But it depends on your desires; I’ll use this setting to reduce possible future problems with secure dynamic updates. Click Next and Finish in the final window.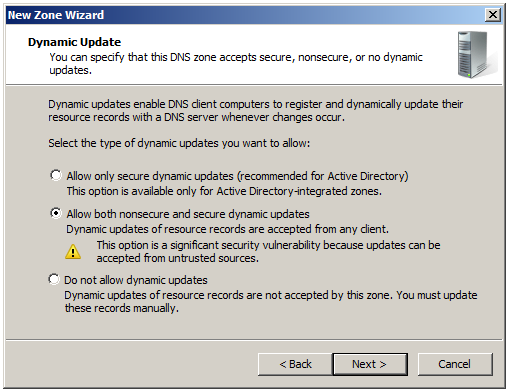
An extra DNS zone (domain2.com) should be visible in the DNS server manager console. As you can see it is not yet populated like domain1.com.

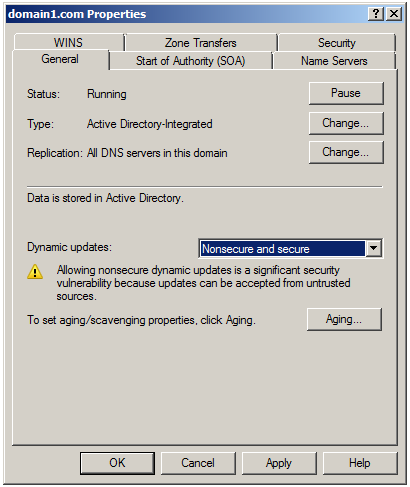
Right click on the first DNS zone (domain1.com) en select Properties.
In the General tab we set Dynamic updates to Nonsecure and secure.Replication is set to All DNS Server in this domain. Click the Change button next to it.
Select To all DNS servers running on domain controllers in this forest: domain1.com.
If we setup a second child domain, this DNS zone will be visible in both domains because they are member of the same forest. Otherwise this DNS zone will only be visible in this domain (domain1.com) Click OK twice to complete.

Install and configure the second domain controller
Install a clean Windows 2008 R2 Server
The procedure for installing the second server is similar as installing the first server.
Note: If you install these servers using a hypervisor, don’t just copy the VHD files to clone the first Windows Server 2008 R2 OS disk!
Start from a fresh installation or use a SYSPREP. Otherwise you’ll end up with a duplicate SID and the installation will fail eventually.
Name this server with an appropriate hostname. We’ll use DOM2-DC1. As the name states, it is the first domain controller in the second (child) domain.
I also recommend tuning off Windows Firewall on both servers during the installation and replication.
Here are the network settings I use for this article.
IP address: 192.168.0.70
Subnet mask: 255.255.255.0
Default gateway: 192.168.0.1
Preferred DNS server: 192.168.0.60
Alternate DNS server: empty
Note that the preferred DNS server is pointed to the forest root domain controllers DNS server (192.168.0.60). This is now our primary DNS server for our root domain.
Now we can add this server to the root domain (domain1.com).
Go to the System Properties and click the Change… button in the Computer Name tab.
Double check your hostname (dom2-dc1) in the computer name text field. In de Member of field, select Domain and fill in the FQDN of your forest root domain (domain1.com). Click OK to finish.
Enter the Administrator credential from dom1-dc1.domain1.com when asked to authenticate. Click OK and close all windows before rebooting the server.
Promoting this server to a Domain Controller
Login with the root forests Administrator account (DOMAIN1\Administrator).
Again, open a Command Prompt window with elevated rights, type dcpromo and press ENTER.
Select Use advanced mode installation and click Next.
Operating System Compatibility
Click Next.
Choose a Deployment Configuration
Select Existing forest. Select Create a new domain in an existing forest and enable Create a new domain tree root instead of a new child domain. Click Next.
Network Credentials
In the text field on top we have to type the name of our root domain (domain1.com).
Select My current logged on credentials. (DOMAIN1\Administrator)If you are not logged on with the Administrator account from the root domain, select Alternate credentials and select the Administrator user from the root domain. Click Next.
Name the New Domain Tree Root
Choose a domain name for the new child domain (domain2.com). Click Next.
Domain NetBIOS Name
I suggest you’ll keep the default setting presented by the installation wizard (DOMAIN2). Click Next.
Select a Site
I
haven’t discussed Sites in this article. But in real live situations, a
second domain is sometimes related to a different site location. If you
have created multiple sites with different subnets, you can choose to
assign a different site to this domain. In this article we make use of one site, Default-First-Site-Name. Click Next.
Now you have to be patient. Examining DNS configuration will take some time…
Additional Domain Controller Options
Now you’ll have to deselect DNS server (we’ll install this role afterwards), and optionally (but recommended) select Global catalog. Click Next.You’ll see a warning message about the fact you have not selected a DNS server role for this installation, but we do this on purpose.
Click Yes. Continue installing without DNS.
Source Domain Controller
It doesn’t matter witch option you choose here. Preferable select Let the wizard choose an appropriate domain controller. Click Next.

Location for Databases, Log Files, and SYSVOL
Unless
you want to move the data to another partition because of performance
or security reasons, keep the default locations and click Next.Directory Services Restore Mode Administrator Password
If you ever need to restore your Active Directory, you’ll need this password. So please document this well and secure. Click Next.
Summary
A final overview of the configuration… Click Next.When completed, reboot the server and login with the root domains Administrator account. (DOMAIN1\Administrator)
Install DNS server role on the child domain controller
Now it’s time to install the DNS server role on the child domain controller.
Open the server manager and click Add roles. Click Next.
In the Roles list, click DNS Server, and then click Next.
Read the information on the DNS Server page, and then click Next.
On the Confirm Installation Options page, verify that the DNS Server role will be installed, and then click Install.
Now we wait about 30 minutes until replication is finished!
Test DNS infrastructure
In the DNS server manager console window you’ll see that the child domain DNS zone is populated (if not, wait a little longer).
Both the root domain DNS zone and the child domain DNS zone are visible in both DNS servers! This is plausible because we set both DNS zones to DnsForestZone instead of DnsDomainZone.

To test if our DNS is still OK, you can open a command prompt window and execute following commands on both domain servers (dom1-dc1.domain1.com and dom2-dc1.domain2.com).
The results should be the same! If not, you’ll missed something and therefore have a problem.
C:\>nslookup domain1.com
Server: UnKnown
Address: 192.168.0.60
Name: domain1.com
Address: 192.168.0.60
C:\>nslookup domain2.com
Server: UnKnown
Address: 192.168.0.60
Name: domain2.com
Address: 192.168.0.70
Change DNS replication scopes
Our goal is to have separate DNS scopes for both domains. To accomplish this we start by changing the DNS zone replication scopes on both servers.
In other words; change the DNS zone replication scope on both servers DnsDomainZone instead of DnsForestZone.
Open the DNS Management console and go to the matching DNS zone.
For dom1-dc1.domain1.com
DNS Forwarding Zone: domain1.comChange Zone Replication Scope: To all DNS servers running on domain controllers in this domain: domain1.com
For dom2-dc1.domain2.com
DNS Forwarding Zone: domain2.comChange Zone Replication Scope: To all DNS servers running on domain controllers in this domain: domain2.com
Again, wait until replication is finished. If you check the DNS zones in the root domain controller (dom1-dc1.domain1.com), only its own DNS zone (domain1.com) is visible.
The same is valid for the child domain controller (dom2-dc1.domain2.com). This DNS server only sees his own DNS zone (domain2.com).
But, we don’t want this, right? We want to have DNS from both domains. Well, we fix this in the next paragraph.
Correct DNS Settings on both domain controllers
Point in the Windows network settings the preferred DNS server to the server’s loopback adapter, 127.0.0.1 (or 192.168.0.70).
Open the DNS Management console, expand the DNS tree and right click on the DNS (domain) server name. Select Properties and go to the Name Servers tab.
Remove the DNS server of the other (root) domain from the Name servers list by selecting the other DNS FQDN and click Remove.
Perform the same procedure on the DNS server of the root domain controller. Remove there the DNS server of the child domain controller.

Wait some time for the replication to complete. Make sure that the Forwarders tab in the child DNS zone settings is empty!

Create DNS Stub Zones on both domain controllers
Go to the Forward Lookup Zones, right click and select New zone…
Zone Type
In the New Zone Wizard, select Stub zone. Make sure Store the zone in Active Directory is enabled. Click Next..

Zone Name
Type the zone name of the other DNS zone. If you apply this configuration in the child domain, we type domain1.com in this field.For the root domain, we type domain2.com. Click Next.

Master DNS Servers
Add
the IP address of the other DNS server. Again, if we create this stub
zone in the first DNS server aka dom1-dc1.domain1.com (192.168.0.60),
add IP address of the second DNS server aka dom2-dc1.domain2.com
(192.168.0.70).Else, if we’re performing this procedure on the second DNS server, type the address of the first DNS (domain) server. Click Next and Finish.

On each DNS (domain) server, a new Stub Zone is created with only a few important records (SOA, NS and A) of the other DNS server (zone).
Notice that no other records of DNS servers, rather than themselves are present in the stub zone. These Stub Zones get their information from their primary zones, located in the other DNS server.
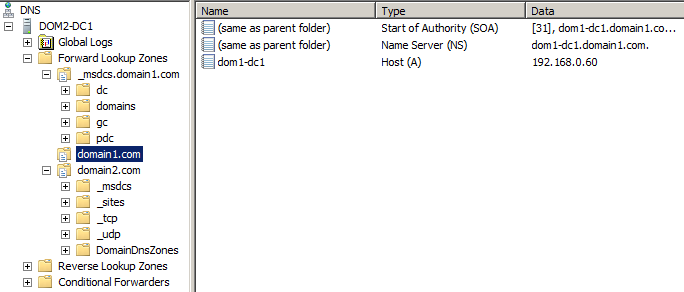
DNS tree on dom2-dc1.domain2.com

DNS tree on dom1-dc1.domain1.com
At this point, no DNS settings other than the newly created stub zones are pointing to other DNS server(s), except for the Forwarder on the root DNS server (8.8.8.8).
Do be sure all DNS settings are OK, run these commands on both servers. Again, the results should be the same on both DNS (domain) servers!
C:\>nslookup dom1-dc1.domain1.com
Server: localhost
Address: 127.0.0.1
Non-authoritative answer:
Name: dom1-dc1.domain1.com
Address: 192.168.0.60
C:\>nslookup dom2-dc1.domain2.com
Server: localhost
Address: 127.0.0.1
Name: dom2-dc1.domain2.com
Address: 192.168.0.70
You can also perform a test with dcdiag.exe to validate our DNS’s.
C:\>dcdiag /test:dns Directory Server Diagnosis Performing initial setup: Trying to find home server... Home Server = dom1-dc1 * Identified AD Forest. Done gathering initial info. Doing initial required tests Testing server: Default-First-Site-Name\DOM1-DC1 Starting test: Connectivity ......................... DOM1-DC1 passed test Connectivity Doing primary tests Testing server: Default-First-Site-Name\DOM1-DC1 Starting test: DNS DNS Tests are running and not hung. Please wait a few minutes... ......................... DOM1-DC1 passed test DNS Running partition tests on : ForestDnsZones Running partition tests on : DomainDnsZones Running partition tests on : Schema Running partition tests on : Configuration Running partition tests on : domain1 Running enterprise tests on : domain1.com Starting test: DNS Test results for domain controllers: DC: dom1-dc1.domain1.com Domain: domain1.com TEST: Dynamic update (Dyn) Warning: Failed to delete the test record dcdiag-test-record i n zone domain1.com dom1-dc1 PASS PASS PASS PASS WARN PASS n/a ......................... domain1.com passed test DNS |
You can ignore the warning about the dcdiag-test-record. If you want to pass all tests, set both primary DNS replications aka DNS Dynamic Updates to Secure only.
Active Directory replication
Now that our DNS infrastructure is well configured, we can test our domain replication. I recommend you wait some time till all errors are expired/fixed.
We can check this by opening an elevated Command Prompt window and perform these two commands; repadmin /showrepl and dcdiag /eTo be sure, run these programs on both servers and check the results.
You can see an example of the results below if all is fine.
C:\repadmin /showrepl Repadmin: running command /showrepl against full DC localhost Default-First-Site-Name\DOM1-DC1 DSA Options: IS_GC Site Options: (none) DSA object GUID: 1c44b9ff-a122-406a-87e1-a6002c7924b9 DSA invocationID: 1c44b9ff-a122-406a-87e1-a6002c7924b9 ==== INBOUND NEIGHBORS ====================================== CN=Configuration,DC=domain1,DC=com Default-First-Site-Name\DOM2-DC1 via RPC DSA object GUID: df07b30c-d6d1-432b-85f2-1a94634ef47f Last attempt @ 2013-02-10 13:50:04 was successful. CN=Schema,CN=Configuration,DC=domain1,DC=com Default-First-Site-Name\DOM2-DC1 via RPC DSA object GUID: df07b30c-d6d1-432b-85f2-1a94634ef47f Last attempt @ 2013-02-10 13:50:04 was successful. DC=ForestDnsZones,DC=domain1,DC=com Default-First-Site-Name\DOM2-DC1 via RPC DSA object GUID: df07b30c-d6d1-432b-85f2-1a94634ef47f Last attempt @ 2013-02-10 13:50:04 was successful. DC=domain2,DC=com Default-First-Site-Name\DOM2-DC1 via RPC DSA object GUID: df07b30c-d6d1-432b-85f2-1a94634ef47f Last attempt @ 2013-02-10 13:55:46 was successful. |
C:\dcdiag /e Directory Server Diagnosis Performing initial setup: Trying to find home server... Home Server = dom1-dc1 * Identified AD Forest. Done gathering initial info. Doing initial required tests Testing server: Default-First-Site-Name\DOM1-DC1 Starting test: Connectivity ......................... DOM1-DC1 passed test Connectivity Testing server: Default-First-Site-Name\DOM2-DC1 Starting test: Connectivity ......................... DOM2-DC1 passed test Connectivity Doing primary tests Testing server: Default-First-Site-Name\DOM1-DC1 Starting test: Advertising ......................... DOM1-DC1 passed test Advertising Starting test: FrsEvent ......................... DOM1-DC1 passed test FrsEvent Starting test: DFSREvent ......................... DOM1-DC1 passed test DFSREvent Starting test: SysVolCheck ......................... DOM1-DC1 passed test SysVolCheck Starting test: KccEvent ......................... DOM1-DC1 passed test KccEvent Starting test: KnowsOfRoleHolders ......................... DOM1-DC1 passed test KnowsOfRoleHolders Starting test: MachineAccount ......................... DOM1-DC1 passed test MachineAccount Starting test: NCSecDesc ......................... DOM1-DC1 passed test NCSecDesc Starting test: NetLogons ......................... DOM1-DC1 passed test NetLogons Starting test: ObjectsReplicated ......................... DOM1-DC1 passed test ObjectsReplicated Starting test: Replications ......................... DOM1-DC1 passed test Replications Starting test: RidManager ......................... DOM1-DC1 passed test RidManager Starting test: Services ......................... DOM1-DC1 passed test Services Starting test: SystemLog ......................... DOM1-DC1 passed test SystemLog Starting test: VerifyReferences ......................... DOM1-DC1 passed test VerifyReferences Testing server: Default-First-Site-Name\DOM2-DC1 Starting test: Advertising ......................... DOM2-DC1 passed test Advertising Starting test: FrsEvent ......................... DOM2-DC1 passed test FrsEvent Starting test: DFSREvent ......................... DOM2-DC1 passed test DFSREvent Starting test: SysVolCheck ......................... DOM2-DC1 passed test SysVolCheck Starting test: KccEvent ......................... DOM2-DC1 passed test KccEvent Starting test: KnowsOfRoleHolders ......................... DOM2-DC1 passed test KnowsOfRoleHolders Starting test: MachineAccount ......................... DOM2-DC1 passed test MachineAccount Starting test: NCSecDesc ......................... DOM2-DC1 passed test NCSecDesc Starting test: NetLogons ......................... DOM2-DC1 passed test NetLogons Starting test: ObjectsReplicated ......................... DOM2-DC1 passed test ObjectsReplicated Starting test: Replications ......................... DOM2-DC1 passed test Replications Starting test: RidManager ......................... DOM2-DC1 passed test RidManager Starting test: Services ......................... DOM2-DC1 passed test Services Starting test: SystemLog ......................... DOM2-DC1 passed test SystemLog Starting test: VerifyReferences ......................... DOM2-DC1 passed test VerifyReferences Running partition tests on : ForestDnsZones Starting test: CheckSDRefDom ......................... ForestDnsZones passed test CheckSDRefDom Starting test: CrossRefValidation ......................... ForestDnsZones passed test CrossRefValidation Running partition tests on : DomainDnsZones Starting test: CheckSDRefDom ......................... DomainDnsZones passed test CheckSDRefDom Starting test: CrossRefValidation ......................... DomainDnsZones passed test CrossRefValidation Running partition tests on : Schema Starting test: CheckSDRefDom ......................... Schema passed test CheckSDRefDom Starting test: CrossRefValidation ......................... Schema passed test CrossRefValidation Running partition tests on : Configuration Starting test: CheckSDRefDom ......................... Configuration passed test CheckSDRefDom Starting test: CrossRefValidation ......................... Configuration passed test CrossRefValidation Running partition tests on : domain1 Starting test: CheckSDRefDom ......................... domain1 passed test CheckSDRefDom Starting test: CrossRefValidation ......................... domain1 passed test CrossRefValidation Running partition tests on : DomainDnsZones Starting test: CheckSDRefDom ......................... DomainDnsZones passed test CheckSDRefDom Starting test: CrossRefValidation ......................... DomainDnsZones passed test CrossRefValidation Running partition tests on : domain2 Starting test: CheckSDRefDom ......................... domain2 passed test CheckSDRefDom Starting test: CrossRefValidation ......................... domain2 passed test CrossRefValidation Running enterprise tests on : domain1.com Starting test: LocatorCheck ......................... domain1.com passed test LocatorCheck Starting test: Intersite ......................... domain1.com passed test Intersite |
That’s it! Your root and child domain are successfully configured.